Monday, January 24, 2011

layered ratatouille

all photos taken by iphone. i apologize for the warm color/hue.
 "ratatouille" is one of my favorite disney movies. not only does it involve food, but it has cute little mice, french accents, and portrays a classic "rags to riches" story. if you haven't seen it, it's about time.

this blog post is inspired by the final meal little chef chooses to prepare for the evil food critique. nothing fancy, just ratatouille. simple, baked vegetables.


ingredients:
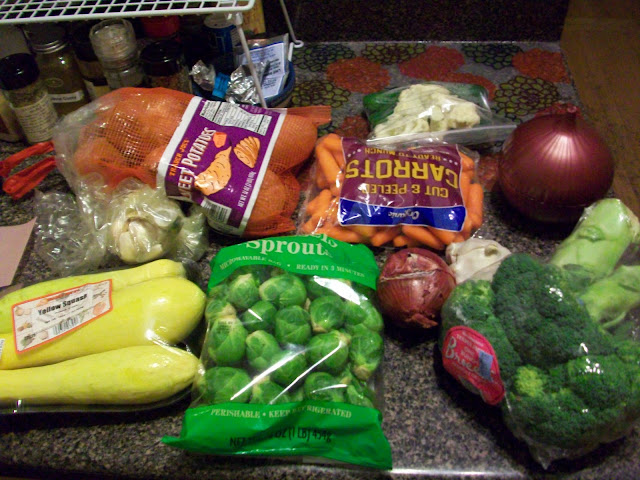
- eggplant, squash, tomatoes, onions, carrots, bell pepper
- extra veggies you have lying around (i had celery, sweet potato, broccoli etc.)
- jar of spaghetti sauce
- 2 cups mozzarella/parmesean cheese
- garlic, italian seasoning, salt, and pepper
- drizzle of olive oil
- sprinkle of bread crumbs

directions:
if you're a perfectionist and like your ratatouille in a perfect domino display, you may want to completely ignore my directions from here on out. you can find those elsewhere. instead, i'm providing you with a 5 minute layering solution to a great tasting ratatouille.

cut vegetables into thin slices. if you have a mandolin (a kitchen slicer), you can use it here. this dish is all about layering, so layer away!

spray casserole dish/dutch oven. spread about 1 cup of spaghetti sauce on bottom


begin layering vegetables by type. when one complete round of vegetables are finished, add approx. 1 more cup of spaghetti sauce. season first round of vegetables with italian seasoning, garlic, salt, pepper, and cheese. drizzle with olive oil. begin second round of vegetable layers.


finish dish with cheese, seasoning, drizzle of olive oil, and bread crumbs. bake at 375 for 45 minutes. you can serve with cottage cheese for added protein. if you are more of a meat person, feel free to add some sliced sausage to the casserole. as always... enjoy and happy cooking :)

Wednesday, January 19, 2011

roasted goodness

for all you veggie lovers out there... this is a dish for YOU!

it's a little known fact in my family that my mother has this "one dish" every couple of months that she won't stop raving about. if you ask her for advice on what to cook, this "one dish" will be the answer. when we would get together with relatives, this "one dish" would always come up in conversation. when we would crave a home-cooked meal, this "one dish" would be cooked. she's gone through a couple of these obsessive dishes: enchiladas, chicken tortilla soup, "margaret salad" (for another blog post), and just recently, roasted vegetables.

although i absolutely love vegetables and rarely eat meat, this seemingly simple dish never struck me as one that would be absolutely delicious. but vegetables, olive oil, and herbs and spices never tasted so good.


ingredients:
- your pick of vegetables. i always make sure to have lots of fresh garlic, onions, and lots of different colors and textures- i love whole corn on the cob in it too
- olive oil
- seasoning (herbs, spices, salt and pepper)

directions:
preheat oven to 375. cut vegetables into bite size pieces. if you are adding whole corn on the cob, i break each corn into 3 sections. place variety of vegetables into greased casserole dish. drizzle with olive oil and season with your choice of herbs and spices. toss lightly and bake for 45 min to an hour. remember, you can gauge baking time and temperature based on your preference. sometimes, i like to cook it at 400 degrees for an extra golden brown finish.

lightly toss vegetables with olive oil and seasoning before placing in oven

even though this dish may seem like a side dish, it doesn't have to be. as a 90% vegetarian (i know, is that possible? you know what i mean...), i eat this dish as the main course! are all you meat-eaters wondering how this could give you enough protein for a meal? don't worry, we can take care of it. cottage cheese is absolutely amazing to dollop on top of your vegetables. the cold creamy texture of the cottage cheese compliments well with the hot crunchy texture of the vegetables. and as always... happy cooking :)


Wednesday, December 15, 2010

found: a red-nose reindeer


merrrrrry christmas!! tis the season of mistletoes, reindeer, christmas trees, and lots of holiday parties!! this post is coming at the most perfect time, the last weekend before christmas. what does this mean? an entire weekend of holiday parties! and i bet you have to "bring a dish of your choice," right? think no more; a fun and festive idea is here! reindeer cookies made from nutter butters. that's right. 2 words of heaven on earth. peanut butter. YUM!!


ingredients:
- 1 pack of nutter butter cookies- yields about 30 cookies (unless you're like me and eat them while making them... whoops)
- 1 pack of m&ms
- 1 bag of pretzels
- 1 container of vanilla/cream cheese icing


directions:
spoon icing onto the eyes, nose, and antler spots.  make sure the eyes are placed in the middle of the cookies. this will allow for ample room at the top for the pretzel antlers. place m&ms on eyes and nose spots. if you want all "rudlophs," obviously, use the red m&ms for the noses only. for the antlers, cut (or bite if they're for you) the bottom of the prezel off. position halfway on top of cookie. and there, you have your reindeer :)

icing application


m&m-eyes/nose application

pretzel-antler application

these cookies are a fun dessert for holiday parties, an entertaining activity for your kids, or simply, a festive treat to have around the house. all i know is... these cookies are a HIT! your guests, kids, and family will all receive great pleasure from eating rudolph for dessert. and not to mention these cookies are YUMMMMY! a perfect combination of sweet, salty, and nutty. you can't go wrong with these!! and as always... happy cooking :) and merry christmas!

Sunday, December 12, 2010

roll up some love


the first time I had sushi I was 17 years old. i was at sushi yoshi in peachtree city, georgia.  after hesitantly tasting my first roll, i remember trying to decide what i thought. either way, i was “cool” because i was in high school and eating an “ethnic food.” when i left for college, i began to experience sushi even more and eventually grew to love it.

the great thing about moving to chicago is the numerous japanese restaurants within a 1 mile radius. it seems almost 95% of them are BYOB, which is a huge plus. nonetheless, the most entertaining way to eat sushi is to make it at home. although i don’t know how to roll it in fish eggs or add Japanese magic and eel sauce, i still receive a simple pleasure out of rolling my own sushi.

what you need that you might not normally find in your kitchen: bamboo mat (can find them for $2-$5)

ingredients we used: swordfish, smoked salmon, avocado, cilantro, carrots, cucumber, cream cheese, crab claw meat, rice


ingredients:
- sticky rice or sushi rice (mine is “calrose” brand)
- rice wine vinegar
- nori (or seaweed paper)
- fish (smoked salmon, crab meat, swordfish, shrimp, whatever you like)
- vegetables (cucumber, carrots, avocado, cilantro, whatever you want)
- cream cheese (if you like california rolls or a creamier roll)
- soy sauce
- wasabi/wasabi powder to mix your own
- sriracha (thai chili sauce EVERYONE should own. i’ve found i like this on sushi better than wasabi! offers more flavor and a smokier spice)


directions:
rice: combine 1 and ½ cups of rice to 2 cups of water. bring to boil then simmer for 20 min until all liquid is dissolved. add rice wine vinegar (i usually put in ¼ cup). rice should be VERY sticky. cool rice in fridge until chilled. you don’t want hot/warm rice.
*this is enough rice to make about 4-5 sheets of rolled sushi, which will feed about 2-4 people. double rice if preferred.

after rice has cooled, place nori (seaweed paper) on bamboo mat. cover nori with rice, careful not to tear it. spread and pat rice down with wooden spoon or fingers. this is what keeps your roll together, so make sure you cover the entire sheet.

add a “line” of preferred ingredients. you can mix up each roll by adding everything or only a couple things. this is where you can be creative!

carefully, roll sushi using wooden bamboo mat as a guide. when the end of the bamboo mat touches the other side from rolling first section, roll mat backwards and keep meeting mat to mat to form an entire roll.

slice off each end and throw away or eat. then slice remaining roll into bite size pieces.

place sticky rice on nori

add "line" of ingredients

carefully roll sushi
slice sushi into bite size pieces

the great thing about sushi is you can literally fill it with anything you like. just like my wonton wrapper entry a couple months back, sushi is one of those things you can personalize and alter for each season. there are fruit sushi rolls, american sushi rolls containing beef and potatoes, and you can always get festive during fall using pumpkin and squash. happy cooking :)

Sunday, December 5, 2010

tis the season for soup

this weekend chicago got its first snowfall. with snow comes cold, and with cold comes soup!! during the next couple of cold months, we will constantly be looking for ways to warm up from the inside out. hot soups are a great dish to make when you don’t want to think: throw anything and everything in the pot. cream cheese? sure, apples? why not. a jar of baby food? of course. soy milk? yea that’ll be good too. most of the soup I prepare is a direct result of having “nothing in the fridge." Random pasta, chicken broth, cream cheese, and some frozen veggies is really all it takes. today’s post is a soup i made from onions and potatoes lying around, carrots that were going bad, and a can of pumpkin i had in the pantry.  a little curry, cilantro, milk, and random ingredients can be so great when combined with household staples. and this is how i made CURRIED PUMPKIN SOUP :)


ingredients: whatever you have in the fridge… ☺ no, but really. I used:
-    1 can of pumpkin (100% pumpkin… unseasoned)
-    2 potatoes
-    1 onion
-    handful of chopped carrots
-    soymilk/heavy cream/sour cream (whatever you have)
-    apple juice (not necessary but kind of a cool idea)
-    handful of cilantro
-    2 tbs butter
-    curry/garlic/pepper/coriander/red pepper flakes
-    1-2 bullion cubes


directions:

heat soy milk (or heavy cream), a can of pumpkin, bullion cubes, & apples juice

 
shred potatoes


add shredded potatoes, diced carrots, & onion

add butter and sour cream (if you wish)
add curry powder and various spices, then finish off with cilantro


curried pumpkin soup is loaded with fiber and has a thicker, creamy consistency that screams comfort food. if you would like more protein, feel free to add beans or tofu. and the great thing is you can add different ingredients each time. this soup also keeps well so it's great for leftovers. enjoy the winter snow and happy cooking :)